Feeds:
Posts
Comments

Archive for August, 2010

There are so many different recipes for brownies out there that it is a bit overwhelming to look for one in the internet. Everyone claims to have the ultimate brownie recipe. Most people I know are very particular about their standards of what a great brownie should taste like. Some like crumbly, others fudgy, others chewey, others cakey, with nuts, with chocolate chips, with frosting, etc. and the possibilities are endless. Some keep their recipes zealously locked in a “bank safe” so that the “state secret” is not shared with anyone. In conclusion, people are very passionate about brownies! For many years, I have tried hundreds of recipes from books, magazines, friends, tv shows, internet, original experiments I make and I truly think this is one of the best. This recipe is adapted from a recipe in marthastewart.com (chocolate chunk brownies). The original recipe calls for more butter and gives you a choice of various chocolate chunks, but I am a sucker for white chocolate. I admit I haven’t made a boxed brownie mix in probably 10 years. I like to melt the chocolate and the butter and mix with the sugar, eggs and vanilla and finally incorporate the flour. It takes me approximately the same amount of time as with the boxed counterpart. It is pretty easy and fun process which my children love! I always, always, have unsweetened chocolate in my pantry in case I crave homemade brownies on a Sunday afternoon, Je! So I want to share the universal love of brownies with you by posting my version of this delicious recipe.

Enjoy!

Double Chocolate Brownies

Ingredients

2 cups unbleached all-purpose flour

1 1/4 tsp baking powder

1 1/4 tsp salt

2 1/2 sticks (1/2 pound plus 4 tbsp) unsalted butter cut into small pieces (more for greasing pan)

7 ounces unsweetened chocolate coarsely chopped or previously melted unsweetened chocolate pouches

2 3/4 cups of granulated sugar

4 large eggs

2 tsp pure vanilla extract

1 cup white chocolate chips (small drops)

Procedure


1. Preheat oven 350ºF. Line a 12×17 inch jelly roll pan with parchment paper and grease with butter or cooking spray, including sides. In a bowl, whisk together flour, baking powder and salt. Set aside.

2. Melt butter and chocolate in bain-marie or double boiler and remove from heat as soon as they have melted and formed a smooth mixture. Set aside and let cool a little. Then transfer to a bowl and beat with the sugar with the whisk attachment of an electric mixer for about 3 minutes in medium speed. Stop, add vanilla and mix for 1 minute. Continue mixing at medium speed and add eggs, one at a time. Stop, scrape bottom with spatula. Bring speed to low and add flour mixture in small batches just until almost fully incorporated with chocolate mixture (do not over beat!!!!).

3. Fold in white chocolate chips. Pour batter into jelly roll pan and spread evenly with spatula. Bake at 350ºF for 20 minutes until brownies have just set. Take out of oven and let cool completely before cutting. I cut with metal spatula instead of with knife. I find it makes a nicer and cleaner cut.

Read Full Post »

Best Blueberry Pie is a crowd pleaser.  Once you try this recipe, oh boy!  you will get hooked.  It truly melts in your mouth and the taste is totally amazing and addictive.  The filling is adapted from a recipe that my friend Cristina’s mother in law, Marisita, gave me a few months ago.  I first tried it at Cristina’s last year birthday celebration where she brought her blueberry pie as a present. I had the privilege of getting a slice and it was absolutely delicious. Later on, Marisita was kind enough to send me her recipe, which I only changed by adding 1 more tbsp cornstarch and butter. Her recipe was inspired by a recipe she found in Marta Sgubin’s cookbook, Cooking for Madam-Recipes and Reminiscences from the home of Jacqueline Kennedy Onassis.

Marisita is a classy and fun mother of three and grandma to four, who has been very active in philanthropy throughout her life.  A few years ago she founded “Ciudadanos Pro-Defensa de la Belleza de Puerto Rico” (Citizens that protect the beauty of Puerto Rico), a non-profit organization which promotes education and taking action in keeping our resources clean and public spaces without litter.  Also, to create awareness of being proud of the beauty of our island and be responsible citizens by doing our part in keeping it that way.

Is it me, or can you also imagine a chorus of people saying “thank you for sharing Marisita” after they try this recipe, because it is truly the BEST BLUEBERRY PIE!

Enjoy!

Best Blueberry Pie

Ingredients

Sweet Pie Dough Recipe or store bought pie crusts

Filling

1 cup of sugar

4 tablespoons of cornstarch

1/2 tsp grated nutmeg

4 cups of fresh blueberries

1/4 stick (2 tbsp) butter, cut into small pieces (a bit more for greasing pie dish)

Procedure


1.  Make Sweet Pie Dough recipe and roll out half to line 9 inch greased pie dish (keep cold).

2.    Preheat oven at 375ºF (for about half hour before baking).  Mix together sugar, cornstarch and nutmeg.  Sprinkle over blueberries and toss until the dry ingredients are evenly distributed.  Spoon the filling into the pastry lined pan.  Dot with pieces of butter.

3.  Roll out remaining pastry to cover top of pie (cut with a round serving plate about 11 inches in diameter). Moisten edges with water to seal crusts together and shape rims. Make small hole in middle and slits around to vent. If you choose to use store bought pie crust, follow manufacturer instructions. Bake in lower third of rack (one under middle rack) over a rimmed baking sheet until deep golden for approximately 1 hour (check occasionally that the rims don’t burn). Let cool to room temperature and serve. Do not serve hot because it will be too runny.

Read Full Post »

As I have mentioned before, lasagnas are great alternatives for boat and fishing trips.  Last week, it was Club Nautico de San Juan‘s International Billfish Tournament, the longest consecutive fishing tournament in the world (57 years).  Anglers from all over the world come to Puerto Rico to this tag-and-release tournament and its a week full of action, fun and camaraderie. My husband Emilio has been involved in this tournament for over 20 years and is currently a board member.  Actually, I met him during the week of a tournament in August 1997 and we were married by June 1998.  So, I have been a “fishing widow” ever since…Ja!, although I join him fishing once in I while, like I did for Club Deportivo de Mayaguez’s Blue Marlin Tournament in the western part of the island, where I witnessed the most beautiful sunsets in my life and placed 1st in the women’s division and 3rd overall (among 500 fishermen, not bad!!)

This is me fishing at Club Deportivo de Mayaguez Blue Marlin Tournament October 2009

The week of the tournament is filled with fun events like the flag ceremony, excursions for the wives of the anglers, fashion shows, the Billfish Foundation’s Auction and of course the themed party.  This year the theme was Disco Night and I must tell you it has been the best party at the tournament yet!  Some members of the board along with other volunteers did a choreography to Dancing Queen and Fever Night mix which turned out to be spectacular and got everyone in dancing mode! There were also Donna Summer and Boy George impersonators.

The Marlin Dancers (I am the 6th one from the left)

Fishing goes on for 4 days with a rest day in between.  Emilio was assigned to bring lunch for two of the four days of fishing, so for one day I sent my Meat Lasagna with green salad and Amarillos en Almíbar (sweet plantains sauted in butter, brown sugar and cinnamon).  The boys (Frankie, Joe, Emilio and Ricky) loved it and left nothing on the plate!  To comply to their requests, I am posting this recipe today.  Here is my version of Meat Lasagna.

Enjoy!

Meat Lasagna

Ingredients

Picadillo Recipe

Basic Tomato Sauce Recipe (yields 3 cups)

8 ounces ricotta cheese or mascarpone

about 15 pieces of lasagna strips

12 fresh basil leaves coarsely chopped

4 cups of shredded mozzarella

Procedure


top layer has tomato sauce, cheese and basil only


1.  In a 13×9 baking dish, place one layer of lasagna strips. (I use the oven ready strips which do not need to be boiled but you may also use the traditional boiled ones.)  Spread 4 ounces of cheese, half of the picadillo-ground beef recipe (remove excess fat and liquid), 1 cup of basic tomato sauce and 1 cup of shredded mozzarella.  Cover again with lasagna strips and repeat procedure.  Place third layer of lasagna strips and cover with remaining cup of tomato sauce, chopped fresh basil and remaining mozzarella. Cover with aluminum foil and bake for 35 minutes at 390ºF. Uncover and broil until cheese on top is golden (about 7-10 minutes).  Serve with garlic bread, amarillos en almíbar, white rice or salad.

Read Full Post »

I use this basic tomato sauce for many dishes including as a dipping sauce for mozzarella sticks, fried calamari, for meat or eggplant lasagna, spaghetti with meatballs, penne all’arrabiatta, vodka sauce, pizza sauce, soups and Mom’s one-pot-spaghetti among others.  It is very simple and versatile, just use your imagination.

Enjoy!

Basic Tomato Sauce

(yields 3 cups)

Ingredients

2  14 1/2 ounce cans of diced tomatoes

1 tsp dried oregano or italian seasoning herb mix

1 1/2 tsp fine sea salt (up to 2 tsp if you want)

Procedure

1.  Puree tomatoes in blender or with hand blender. Add to a small saucepan and simmer for about 15 minutes in med-low heat with herbs and salt. for a spicy sauce add a generous pinch of peperoncini or red pepper flakes.

Read Full Post »

This sweet pie dough recipe is the best I have found so far.  Relatively easy to make, consistent results and so good!!!!!!!  I have been reading Cook’s Illustrated magazine for many years. I find this magazine’s detailed recipes, tips and experiments full of valuable information as well as fun.  If you haven’t had the chance to experience this magazine I invite you to do so.  This is where America’s Test Kitchen, located just outside of Boston, “play” with recipes in a lab-kitchen and then publish the results (they also have a TV show hosted by Christopher Kimball).  Its findings are illustrated (either with pictures or drawings) and provides its readers with bits of history, chemistry, culture and valuable suggestions.  After many trials and errors, I bumped into this recipe while reading one of Cook’s Illustrated editions about 2 years ago, which I have only altered by adding a bit more sugar.  I mainly use it for Blueberry Pie, but can also be filled with your choice of ingredients.  Sometimes I have left overs from the trimmings of the pie discs and use it to make a small oven empanada filled with spinach and feta cheese, picadillo, stewed chicken, shrimps or sauteed mushrooms with onions and cheese, mixing sweet and savory in every bite. Also, can be used to cover a fruit cobbler.

The tricky thing with baking and doughs is the fact that you NEED to know a little about chemistry.  The effects baking powder will have when reacting with liquids or the gluten formed when flour is mixed with water, all have to do with scientific reactions.  Your ability to know when, how much, at what temperature  and in what way to incorporate ingredients will determine how successful you will be in your culinary endeavors.  That being said, with this pie dough recipe, Cooks Illustrated “kitchen scientists” tried making many pie recipes with varying results (148 to be exact!!!).  Some were too hard, others too flaky, others too sandy, others just too inconsistent.  For your information, gluten, long chains of protein that form when flour mixes with water, is what gives pie dough its structure. The more you knead and the more water you add, the more gluten forms and the result is a tough pie dough. The recipes I had seen before, mostly keep a ratio of about 5-6 tbsp of ice water to every 2 cups of flour to ensure flakiness, but with inconsistent results which depended on that days humidity among other factors (too dry, too hard, difficult to roll out, dough sticks or tears, etc.) In short, they discovered that vodka lets you add more liquid to the dough (making it easier to roll out) without toughening the crust.  The simple reason is because gluten doesn’t form in ethanol (vodka is 60% water 40% ethanol).  As a result, this recipe gets the benefits of  8 tbsp of water but actually has 6 1/2, which limits the formation of  gluten and guarantees tenderness.  The same reasons account for incorporating vegetable shortening in the recipe.  Butter has about 20% water content and starts melting at 50ºF, as opposed to vegetable shortening which has no water and melts at very high temperatures, so a combination of both butter and shortening provided a balance between flavor and tenderness.  In addition, flour is separated into two groups; the flour which will be covered with fat (which in turn will not absorb water), and the uncoated flour (which will absorb water and form gluten).  For a consistent flaky recipe, you need the same ratio of fat coated flour to uncoated flour to ensure that when the dough is rolled out, the gluten stretches into sheets that are separated by gaps of fat which will melt while being baked and result in crisp, flaky layers in the crust.  The best way to do this is in a food processor.

There are 3 steps to ensure a delicious, tender, flaky sweet pie dough.

1.  Blend part of the flour mixture with the fats (butter and vegetable shortening) to make sure there is a consistent amount of flour covered in fat in the final dough.  Fats should be cold.

2.  Add remaining flour and pulse to ensure consistent amount of uncoated flour in final dough.

3.  Sprinkle mixture with water and vodka and fold mixture until dough sticks together.

Note:  You can feed this sweet pie dough to children because the alcohol will impart no flavor and evaporate in the oven.


Sweet Pie Dough

Ingredients

2 1/2 cups unbleached all-purpose flour, plus extra for work surface

1 tsp salt

3 tbsp sugar

1 1/2 sticks (12 tbsp) cold unsalted butter, cut into 1/4 inch slices

1/2 cup of cold vegetable shortening cut into 4 pieces

1/4 cup of cold vodka

1/4 cup of cold water

Procedure


1.  In a food processor, mix 1 1/2 cups of flour, salt and sugar by pulsing two or three times.  Add butter and shortening and process until there is no uncoated flour and forms cottage-cheese-like curds (about 15-20 seconds).

2.  Scrape bowl with spatula and redistribute dough evenly around blade. Add remaining flour and pulse until dough is evenly distributed around bowl and mass has broken up (4-6 pulses).  Empty mixture into bowl.

3.  Sprinkle with vodka and water over mixture and quickly fold with rubber spatula by pressing down until dough is slightly tacky and sticks together.

4.  Divide dough into 2 balls and flatten into disks. Wrap into plastic paper and refrigerate at least 45 minutes or up to 2 days.

Read Full Post »

The word “orzo” in italian means “barley”. Orzo pasta (pasta shaped like rice or grain) is very versatile. It can be boiled, baked, used as a filler in casseroles or when making stuffed peppers.  Also, great in soups. The best orzo is made of durum semolina flour and is very popular in Italy, Greece and other Mediterranean and Middle Eastern Countries.  I like this version of orzo pasta because it is very savory and not very heavy. Add as much spinach as you can and by all means… it has to be fresh!  Serve alone or as a side dish.  Orzo with Spinach is also great as a cold salad.  If you are going to serve it as a salad, drizzle with a little extra virgin olive oil before serving so that it looks shiny and fresh.

Enjoy!

Orzo with Spinach

Ingredients

1 tbsp extra virgin olive oi

3 ounces of thinly sliced pancetta chopped

1/2 cup of yellow or white onions cubed

1/3 cup red bell pepper finely cubed

2 fresh garlic cloves minced

6 cups of fresh spinach (lightly packed)

2 tbsp cold butter

2 tbsp dry white wine

2 tsp fine sea salt

pepper to taste

drizzle of white truffle oil

1 pound of orzo

fresh parmesan cheese

Procedure


1.  In a deep large skillet, heat extra virgin olive oil in medium.  Add pancetta and saute for about 5 minutes until pieces begin to cook. You don’t want pancetta to be crispy or burned. Stir occasionally.

2.  Add onions and red peppers and saute for about 2 minutes.  Add garlic and butter and continue to saute for about 1 minute.  Add white wine to deglaze pan. Immediately add spinach and stir until it has wilted.

3.  Meanwhile, in a med sauce pan, bring about 6 cups of water to a boil.  Add a generous pinch of salt and cook orzo according to package instructions.  Once cooked, drain and add to spinach mixture and saute for a few minutes.  Add drizzle of white truffle oil, salt and pepper to taste.  Add freshly grated parmesan cheese once you serve.

Read Full Post »

It is no mystery that we like to entertain at home. When we have guests over for dinner, I like to offer at least one thing that they don’t have in their fridge or couldn’t readily buy in the supermarket.  A homemade appetizer, a twist on a traditional dish or something as simple as this Strawberry Butter, is what makes the meal memorable and different.  I have been making this butter for many years with much success and we have close friends that expect it to be at the dinner table when we invite them over (right Bertin!).

I had not prepared it for a while until a few weeks ago, while having lunch at Mariposa Restaurant (Neiman Marcus) with my good friend Carmen in Miami, I was reminded about it since they serve their traditional strawberry butter with popovers. So as soon as I returned home I made sure I had some Strawberry Butter in my fridge.  Hope you make some soon!

Enjoy!

Strawberry Butter

Ingredients

1/4 pound butter (1 stick at room temperature)

3 tbsp good quality strawberry preserves

Procedure

1.  In a small bowl whisk butter until fluffy.

2.  Add strawberry preserves and continue to whisk until fully incorporated.

3.  My favorite way to store it  is by making a “log” of butter and wrap it with clear plastic wrap to store in the fridge (like icebox cookies). Cut rounds when ready to serve. This butter should be served at room temperature. You may also put it a candy mold or piping bag to serve in individual bread plates, in ice cube trays or  in a large butter crock.  Delicious with warm bread or popovers.

Read Full Post »

Lemon Meringue Pie should be creamy and tart, instead of gelatinous and too sweet, at least according to my tastes. Ja!  I have been making this recipe for 20 years now! WOW, I can’t believe I said 20 years.  It is inspired in a recipe from Gourmet Magazine April 1990.  The original recipe calls for key limes, but the taste was too strong for some people (I like it!).  So I have made some changes over the years to find the perfect balance between sweet and sour.  Large yellow lemons work great for this recipe.  This pie is also pretty easy to make.  I  like the fact that the crust is crumbly instead of like cardboard.  Serve with a little raspberry coulis on the side if you can make it.  I also make mini lemon meringue pies in a lined mini muffin pan (always a hit!). Place filling and meringue in piping bags to better handle the smaller portions.  Also, you can use the filling to make mini lemon tartlets (use store bought tartlets). You can make the night before and store in the refrigerator. Here goes the recipe for one of my favorite desserts!

Enjoy!

Click here to print recipe

Lemon Meringue Pie

Ingredients

Crust

1 1/4 cup zweiback or graham crackers crumbs (about 9 honey graham crackers, 5 oz.)

2/3 cup almonds (ground fine in a food processor)

1/2 stick (1/4 cup) unsalted butter, melted and cooled

1/3 cup sugar

Filling

3 egg yolks

14 ounce can of sweetened condensed milk

1/2 cup fresh lemon juice (about 3 lemons )

zest of 1 lemon (about 1/2 tablespoon)

Meringue

3 egg whites (at room temperature)

pinch of salt

1/3 cup of sugar plus 2 tbsp

Procedure


1.  Put crackers and almonds in a food processor and finely ground them.

2.  Transfer to a bowl and combine with sugar and cooled melted butter by folding with a spatula.  It will resemble wet sand.

3.  Press mixture into the bottom and sides of pie dish (9-10 inches).  Bake the shell in middle rack of pre-heated oven at 350ºF for 10 minutes or until browned lightly. Let the shell cool on rack.

4.  Meanwhile, in a large bowl beat yolks with condensed milk (I use an electric mixer in med-hi for about 2 minutes).  Stir in the lemon juice a little at a time to combine filling well.

5. Spoon the filling into the shell, spreading evenly, and chill in the refrigerator for about 1 hour.

6.  When 15 minutes are left in the fridge, pre-heat again oven at 350ºF. Beat egg whites with pinch of salt until they hold soft peaks.  Add the sugar, beating, a tablespoon at a time until it holds stiff peaks.  Spread the meringue over the filling and bake the pie in the middle of rack for 15 minutes, or until it is just golden.  Chill pie for at least 2 hours and serve.

Read Full Post »

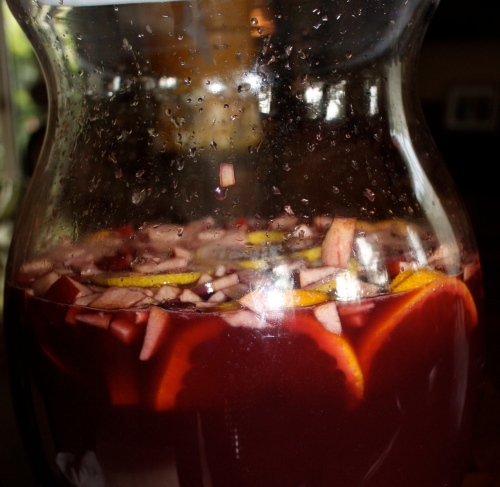
Sangria is the best antidote for a hot summer afternoon.  My recipe has never let me down and is always a great success when I prepare for my guests. Easy, refreshing, not overly sweet and mild alcohol content.  This drink can be served in a pitcher, punchbowl or a classic beverage dispenser with spigot.  I usually make it in large quantities because in Puerto Rico, Sangria is a very popular drink and people would drink Sangria over beer or hard liquor anytime.  Here, most informal family restaurants offer Sangria as part of their menu. The important thing is to make it fresh! If you choose to make it ahead of time, prepare the mixture and leave out the lemon soda and ice until the moment you are going to serve.  For best results choose a young, fruity, unoaked, inexpensive wine. Most of the time, I buy and inexpensive wine from the Rioja region in Spain made from Tempranillo grapes, but you may use a French boujolais, Italian dolcetto or lambrusco.  My suggestion is that you serve over ice instead of adding the ice to the mixture so that it doesn’t become diluted.

This wine punch typical of Spain has been popularized in many countries in the Caribbean and Latin America.  A similar version known as Sangaree can be found in the West Indies.  There is also a simpler variant of Sangria called “Tinto de verano” ( red wine of summer or wine spritzer) which is part wine, part “gaseosoa” (a mixture of carbonated water and lemon juice) garnished with lemon slice.  I like to make this version when I am on the boat because it is so simple to make and you know that boat kitchens have limited space.  There are hundreds of recipes depending on the regions, the ingredients at hand and the preferences and creativity of the person preparing the Sangria.  However, what makes a Sangria a Sangria is that it has all of the following:  young fruity red wine, chopped or sliced fruit, fruit juice,  sweetener and a small amount of liqueur like brandy or Cointreau.  In addition, most Sangria recipes add carbonated lemon soda.  Here is my version of Sangria!

Salud!

Sangria

Ingredients

1 bottle of young, dry, inexpensive red wine (750 ml)

1 1/2 cups of orange juice

1/4 cup sugar

4 tbsp Cointreau, Grand Manier, Brandy or Rum

1 can of Lemon Sierra Mist, Sprite or 7-up, 11.27 ounces (If you don’t have any of these make a mixture of “gaseosa”, made with sparking water and fresh lemon juice)

1/2 red apple (diced and diced)

1/2 orange (thinly sliced and halved)

1/2 half a yellow lemon (thinly sliced and halved)

ice

Procedure

1.  With a large spoon, mix all ingredients in a large pitcher, punchbowl or beverage dispenser with spigot a few hours before serving to allow flavors to settle.  If you are going to make it ahead of time, leave out lemon soda and add just before your serving.  Serve Sangria over ice.

Read Full Post »

Ceasar Salad is near the top of my list of favorite lunch or side dish alternatives.  I admit I am very picky about the way the dressing should taste so the solution to this problem is to make my own dressing.  Simply put, some restaurants have very bad commercial Ceasar Salad Dressings!  Others are heavenly! Some are too creamy others too liquid, too strong or too mild and the ones with excess of anchovy fillets…. well, I am not a big fan.

Ceasar Salad’s creation is attributed to Italian restauranteur Ceasar Cardini in his restaurant in Tijuana, Mexico on 4th of July 1924.  The story goes that he ran out of supplies and improvised with the ingredients at hand.  The original recipe for the dressing includes eggs, olive oil, worcestershire sauce (which in part is made with anchovies), fresh garlic cloves and lemons but no anchovies, they were later added by “recipe revisionists”.  The salad first appeared in the continental USA in the menu of a restaurant in Los Angeles, California in 1946 and the Cardini family registered a trademark in 1948.  I remember when as a young girl in early 1980’s, I went on a cruise with my parents (the Galileo Galilei) through the Mediterranean, and for dinner the waiters would make the dressing tableside which added to the whole experience and drama of ordering Ceasar Salad.  Originally, the leaves of the romaine lettuce were served whole in order to eat with your hands by grabbing through the stem and take a bite of the crisp lettuce covered with the dressing, croutons and shaved parmesan cheese.  I coarsely chop the lettuce or you can tear it with your bare hands.  Try making your own croutons with bread that is a few days old, it makes a big difference.  Make sure the eggs you use are clean and to coddle them (cook them partially in hot water) before you use. Also, you may serve with grilled chicken strips, churrasco (skirt steak) or grilled shrimp to make it more hearty.  I created my recipe by watching friends and family make their versions, reading cook books and magazines, and tasting Ceasar Salad Dressing in many restaurants.  Here is my version of Ceasar Salad Dressing.

Enjoy!

Ceasar Salad Dressing

Ingredients

2 eggs (cooked in very hot water but not boiling, for 1 minute)

1 cup of extra virgin olive oil

1/4 tsp anchovy paste (optional)

1/2 tsp salt

1/2 tsp worcestershire sauce

1 tsp dijon mustard

2 fresh garlic cloves (remove germ)

4 tsp fresh lemon juice

pepper to taste

Procedure

1.  Carefully place eggs in hot water (just below boiling point) for 1 minute.  Take out of hot water and put under running cold water to stop cooking.  Take out of shell scraping inside with small spoon.

2.  In a blender or with a hand blender, beat eggs for about 30 seconds.  Add anchovy paste, garlic cloves (remove germ for better taste and make sure they are fresh), worcestershire sauce, salt, mustard, pepper and lemon juice. Pulse until mixed.

3.  With the machine on, start to pour olive oil in a steady stream. The result will be a creamy dressing. Store in a sealed dressing container in the refrigerator up to 1 week.  Serve over romaine lettuce, croutons, chopped cilantro and top with shaved or grated fresh parmesan cheese.

Important note: There is potential risk of infection by salmonella bacteria occasionally found in raw egg from cracked or improperly washed eggshells.

Read Full Post »

Older Posts »